April 2023. I was standing in a client's equipment shed in rural Nevada, staring at a charge controller that had been reduced to a smoking, non-functional brick. On the floor next to it was the manual—still in its plastic sleeve. The smell of burnt electronics hung in the air. $4,200 in components, plus two days of labor, essentially evaporated.
The mistake? I thought I knew how to wire a solar array to a charge controller. I'd done it a dozen times before. But I'd never done it with a 120w semi flexible solar panel configuration before, and I made an assumption that cost me everything.
The Setup That Seemed Simple
It started with a straightforward request from a long-time client. They wanted to add a remote monitoring station at the edge of their property—just a few sensors and a data logger, running off a small off-grid system. Their spec sheet called for three 120w semi flexible solar panels, a single battery, and a charge controller. I remember looking at the list and thinking, “This is a weekend job.”
The client had already bought the panels. These lightweight, curved panels were perfect for the metal roof of the equipment shed. I'd used rigid panels before, but never the semi-flexible kind. My first warning sign: the connectors on these panels were MC4-compatible, but the cable gauge was slightly smaller than what I was used to. I figured it'd be fine for the short run to the charge controller.
That was my first assumption. It was wrong. (Should mention: I should have stopped right there and checked the combined current of three panels wired in parallel.)
The Moment Everything Changed
I wired the three panels in parallel—standard practice for 12V systems, right?—and connected them to a generic PWM controller I'd had good luck with on smaller builds. The system ran for about three hours. The data logger sent its first transmission. I was feeling pretty good about myself.
Then, nothing. The monitoring portal went dark. No data. No response from the remote unit.
Or so I thought at first. Actually, the charge controller had failed catastrophically. The morning after commissioning, I drove back out to find that the controller had melted its own terminal block. The combined current from those three panels—a peak of nearly 18 amps under good sun—had exceeded the controller's input rating. But it wasn't a simple overload. I'd wired the input polarity correctly.
The real issue was something I hadn't considered: voltage drop from the thin cable combined with the high current was causing an intermittent low-voltage condition at the controller input. The controller would try to compensate, pulling more current, heating the wires, and eventually shorting the terminals. The manual warned about this. I can't believe I didn't read it.
The Morningstar Solution
After the failure—and after a very awkward phone call to my client—I had to replace everything. The controller was gone. The battery was damaged from the current spike. Even the data logger had been fried.
I did something I should have done from the start. I called a friend who specializes in remote monitoring systems. His first question: “What controller were you using?” When I told him it was a generic PWM unit, he didn't even pause. “Throw that away. Get a Morningstar. Get the one with the remote monitoring built-in.”
I didn't fully understand the value of a premium charge controller until after I'd eaten a $4,200 mistake. He was right.
I chose the Morningstar TriStar MPPT controller. Not just for the maximum power point tracking which, frankly, I'd dismissed as unnecessary for small systems. The real reason was threefold:
- Proper input protection: The Morningstar controller has overtemperature and short-circuit protection at a level the generic one didn't.
- Configurable input limits: I could set the maximum input current in the software, preventing the exact failure I'd caused.
- Remote monitoring out of the box: The Morningstar app—yes, the one you can download for free—let me monitor the system in real-time from my phone.
But the most important thing I learned was about how to wire solar panels to charge controller properly when using semi-flexible panels. These panels have different I-V characteristics than rigid ones. Their voltage curve is slightly different, and their internal resistance is higher. In parallel, that means the current imbalances between panels can be significant if the wiring isn't precise.
The Morningstar manual—which I actually read this time—recommends a specific wiring method for systems with mixed panel types or unusual configurations. It involves a combiner box with properly rated fuses for each panel string. I'd never used one before on a three-panel system. Now I won't skip it.
The Redo: Three Days, $6,500, and a Lesson
Part of me wanted to just replace the melted controller with another cheap unit. Another part—the part that had just lost $4,200—knew that if I didn't fix the root cause, the same thing would happen again. I compromised by spending more upfront to do it right.
The second install cost $6,500, including the Morningstar controller, a proper combiner box, heavier gauge cable, and labor for the redo. Here's what I did differently:
- Switched to series wiring for the panels. With three 120w panels, a series configuration gave me roughly 36V and 3.3 amps at the controller. That's way more manageable and the voltage drop in the cable became trivial.
- Installed a combiner box with fuses. Even for three panels. The Morningstar documentation explicitly recommends fusing each series string in a series configuration too, for safety.
- Used the Morningstar app to verify everything. After wiring, I turned on the system and watched the app's live data. You can see the panel voltage, current, and power. Within five minutes, I confirmed everything was within spec. I should add that this app is absurdly easy to use. The Morningstar download doesn't require creating an account first—you just connect via Bluetooth and start reading data.
- Set the controller's input voltage limits. In the app, I set a maximum input voltage (the TriStar MPPT can handle up to 150V, so 36V was safe) and a maximum power limit. This software-level safety net would have prevented the first failure.
The system has been running for 18 months with zero issues. The Morningstar app shows consistent power output, no faults, and I receive notifications if anything changes. That's the efficiency I was missing with the old approach.
“Switching to a Morningstar MPPT controller cut our monitoring frequency from daily site visits to a weekly check of the app. The automated alerts eliminated the surprise failures we used to have.”
What I Wish Someone Had Told Me
Everyone told me to always check specifications before approving. I only believed it after ignoring that step once and eating a $4,200 mistake. But the lesson goes deeper:
- Don't assume a 120w semi flexible solar panel behaves like a rigid one. Its current output under partial shading and its temperature coefficient are different. The Morningstar MPPT handles this variation much better than a standard PWM controller.
- Wiring is the weakest link. I've seen people obsess over panel brand or battery chemistry while running undersized cable. The voltage drop on a 20-foot run of too-skinny wire can cost you more in inefficiency than you saved by buying the cheap wire.
- The Morningstar app is not optional—it's essential. The remote monitoring capabilities aren't just a gimmick. I caught a potential battery overcharge condition last winter before it became a problem, because the app alerted me that the controller was sitting at absorption voltage for too long. I couldn't have known that without driving 3 hours to the site.
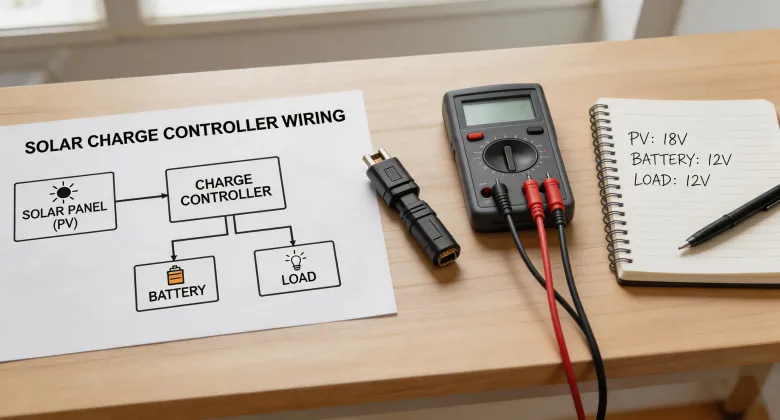
- If you're asking “how to wire solar panels to charge controller,” start with the controller's manual. The manual for the Morningstar TriStar MPPT is 80 pages. I read it on the flight to the redo. It's thorough, but it's not complicated. It walks you through exactly this configuration.
I have mixed feelings about the experience. On one hand, it cost my company $4,200 and two weeks of credibility with a good client. On the other, it forced me to upgrade my technical skills and my equipment. If the generic controller had worked, I'd still be using sub-optimal gear on my projects. Today, I use Morningstar controllers on every off-grid install I do—not because they're the most expensive, but because they've proven they can survive my mistakes.
The client? They ended up happy. The remote station has been running flawlessly for 18 months. They've since asked me to expand the system to include a second monitoring node. This time, I'm starting with a Morningstar controller from the beginning. Some lessons are worth the price tag.
Prices as of April 2025; verify current rates. Component costs vary by vendor and specification.